Implementing Intestinal Ultrasound in Your Practice
A clinical implementation guide from the iUSCAN Clinical Implementation Committee
Build an IUS service with the committee’s guide to business planning, training, clinic workflow, documentation, billing review, and pilot evaluation.

Building an intestinal ultrasound (IUS) service takes a coordinated plan for people, equipment, clinic operations, and follow-up. This guide brings together the iUSCAN Clinical Implementation Committee’s business plan, clinical workflow blueprint, and documentation framework to help gastroenterology practices move from initial interest to a sustainable service.
The framework was developed by Drs. Gauree Konijeti, Mark Mattar, and Zoe Gottlieb on behalf of the Clinical Implementation Committee, led by Drs. Phillip Gu and Sanket Patel. Adapt the steps to your practice, training pathway, institutional requirements, and patient population.
1. Define the service and build your team
Start with a specific clinical need. Your first service might support disease activity assessment during IBD clinic, treatment response monitoring, or scheduled examinations requested by other gastroenterology providers. Estimate the number of appropriate referrals and identify who will act on the results.
IUS provides a noninvasive, radiation-free assessment of the bowel wall and surrounding structures. It can support objective monitoring and timely decisions in IBD care. Choose its role alongside biomarkers, endoscopy, and other imaging according to the clinical question and the examination’s limitations. The AGA Clinical Practice Update on IUS provides clinical context.
Bring the people responsible for implementation into the discussion early:
Clinical lead and trained examiners: define indications, training, supervision, reporting, and responsibility for results.
Department and practice leadership: agree on funding, protected time, staffing, and how the service supports patient care.
Clinic manager and schedulers: plan room use, appointment types, referral instructions, and access for add-on examinations.
Information technology and imaging teams: connect the ultrasound system, electronic health record (EHR), and picture archiving and communication system (PACS).
Billing, credentialing, and relevant radiology or ultrasound stakeholders: confirm local requirements and clarify the scope of the GI-led service.
Your first deliverable: a one-page service proposal naming the clinical lead, initial patient group, planned location, expected volume, requested resources, and pilot measures.
2. Make the business case with local numbers
A useful business plan explains the patient care need and shows what it will take to deliver the service. Describe current access to objective disease assessment, potential benefits of receiving results during a clinic visit, and the operational problem you want to solve. Use your own wait times, referral volumes, and patient feedback.
Build a pro forma: a projection of costs and income that leadership can use to assess feasibility. Include startup costs and ongoing expenses separately.
Startup: ultrasound system and probes, software and connectivity, training and certification, travel, initial supplies, and time needed to build the EHR workflow.
Ongoing: service contract, supplies, software fees, room use, staff support, and clinician time for scanning, documentation, and review.
Income and funding: expected completed examinations, payer mix, verified collections per examination, and any committed institutional or philanthropic support.
Use completed examinations multiplied by expected collections per examination to estimate clinical revenue. Subtract the costs of delivering the service. Compare a conservative pilot volume with a realistic growth scenario, and show how staffing and room capacity change as volume increases.
The committee’s business-plan examples are planning illustrations, not current equipment quotes, reimbursement rates, or a guaranteed break-even timeline. Replace those assumptions with vendor proposals and information from your own finance and billing teams. Track potential improvements in access and patient experience separately from financial returns.
3. Prepare the equipment and training pathway
Arrange demonstrations of systems suitable for bowel imaging, including a high-frequency linear probe and a lower-frequency convex probe. Involve the clinicians who will scan and the teams who will maintain the equipment. Evaluate image quality, ergonomics, labeling, image export, service support, and compatibility with institutional purchasing agreements.
Choose a dedicated IUS room or a plan for moving the machine between examination rooms. Identify secure storage, power and network access, gel and cleaning supplies, and a person responsible for restocking and maintenance. Confirm cleaning procedures with the relevant institutional team and the manufacturer’s instructions.
Plan training and service development together. Use the iUSCAN Education page to review available training and certification opportunities. Arrange supervised practice, mentorship, and institutional credentialing before independent clinical use. Training completion and local authorization to practice are separate steps.
The committee’s blueprint organizes preparation around introductory training, hands-on training, and subsequent assessment. During supervised skill development, correlate examinations with available endoscopy and cross-sectional imaging, and discuss uncertainties with an experienced examiner. Brief practice of an individual bowel segment supports learning; it does not establish a fixed duration for a complete clinical examination.
4. Choose how IUS fits into the clinic day
Practices can use one or more of the following visit models. Begin with the model that your staffing and room capacity can reliably support.
IUS during a clinic visit
Reserve time within a new or return IBD visit when an examination is anticipated. The treating clinician confirms the indication, places any required order, and arranges the examination. When an appropriately trained clinician performs and interprets the scan, results can be discussed during the visit and incorporated into the care plan.
A same-day add-on examination
The referring provider contacts the IUS team directly with the clinical question and relevant history. Confirm examiner availability, room access, and how the visit will be registered before moving the patient. Define who receives the findings and who is responsible for discussing the plan with the patient.
A scheduled IUS visit
The referring provider submits an appointment request and a brief note with the indication, IBD diagnosis, and any surgical history or altered anatomy. The scheduler sends locally approved preparation and billing information. The IUS team completes the examination and report, then communicates the result to the patient and referring provider through the agreed process.
Provide schedulers with an availability calendar and clear rules for routine referrals and add-ons. Allow longer appointments early in implementation, or limit the number of scans until the team understands the time required for examination, documentation, and room turnover.
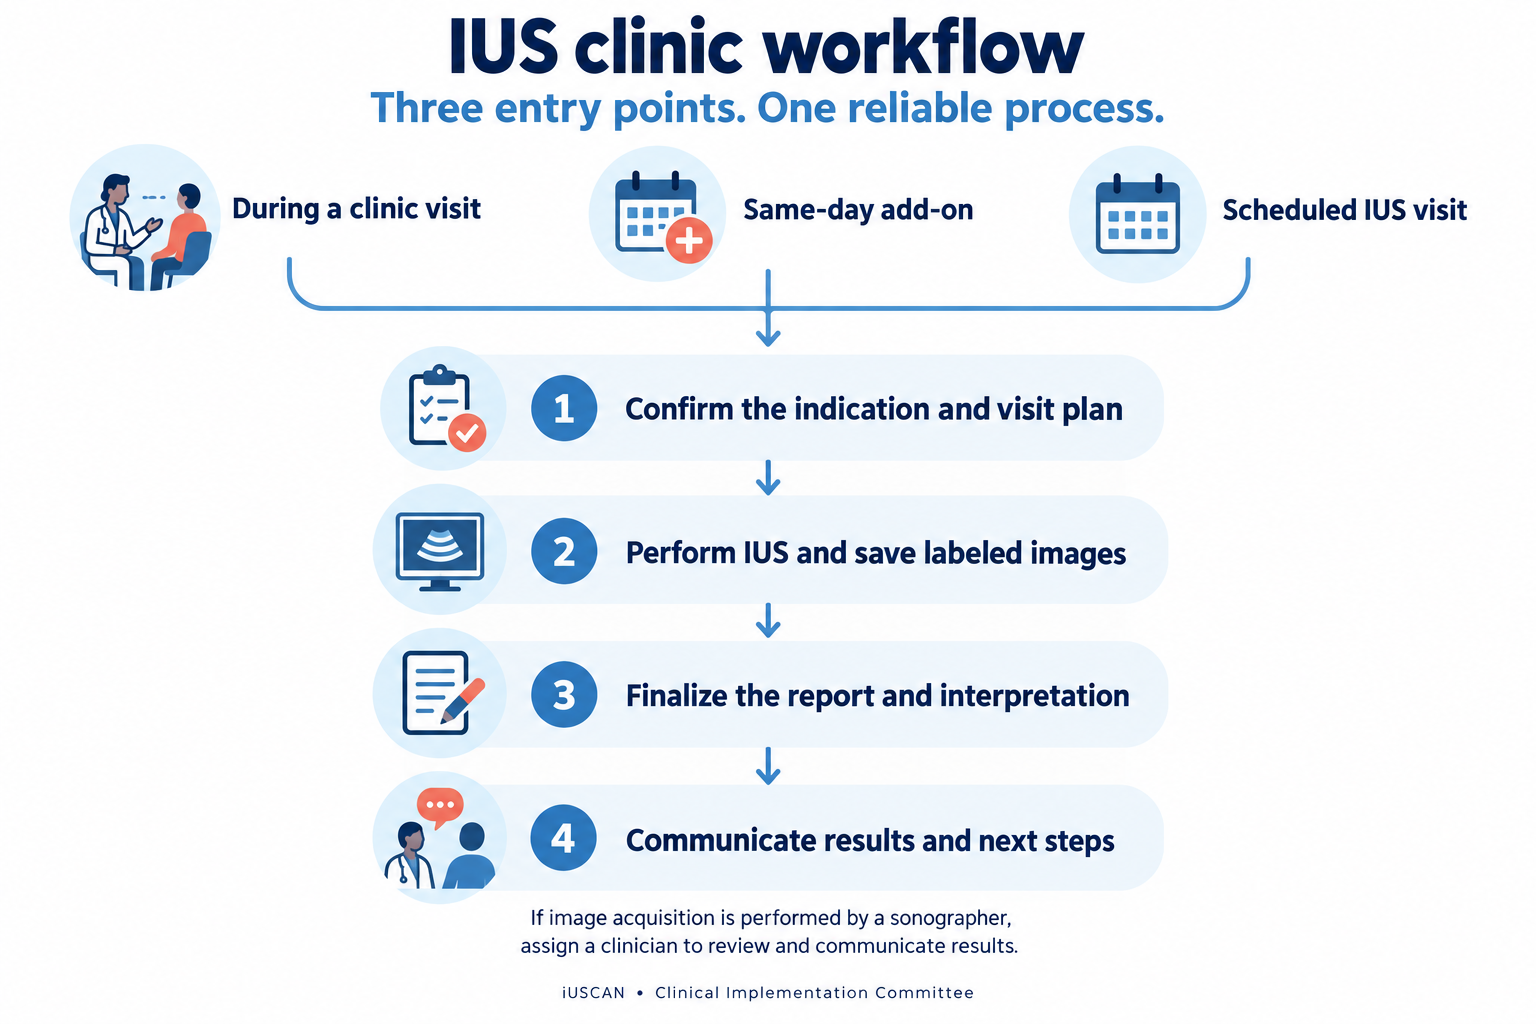
Three entry points share the same essential steps: a clear indication, image storage, a completed report, and communication of results.
5. Test the complete patient and image workflow
Before launch, walk a test encounter through registration, ordering, image acquisition, image storage, reporting, and billing. Confirm that the report and saved images can be found by the clinicians who need them, including when reviewing a previous examination.
Before the visit: record the clinical question, relevant prior results, and postoperative anatomy. Check applicable authorization and consent requirements, and give the patient preparation and expected cost information.
During the examination: confirm identity and indication, explain the bowel-focused examination, and use a standardized acquisition and labeling approach. Record which segments were assessed and any technical limitations.
After the examination: save labeled still images and cine loops, finalize the interpretation, and document the next steps. Make the report accessible in the EHR and link it to the imaging record when supported.
When a sonographer acquires the images, establish the process for preliminary documentation, clinician review and attestation, and communication with the patient. Tell the patient when to expect the interpreted result. Assign a clear route for communicating findings that require prompt attention.
6. Standardize the IUS report
The committee’s documentation template provides a common structure that can be adapted to an EHR note or SmartForm. A consistent report makes interval comparison and communication easier. Document what was actually assessed, including areas that could not be adequately evaluated.
Examination details: patient identifiers, examination date, examiner, primary IBD provider, diagnosis, indication, relevant anatomy, and date of the prior IUS examination.
Technique and image record: the approach used, segments examined, stored images and clips, and any limitations.
Segmental findings: bowel wall thickness in millimeters, vascularity, bowel wall stratification, inflammatory mesenteric fat, and colonic haustration where applicable. Include the terminal ileum, assessed colonic segments, relevant anastomoses, and other examined small-bowel segments. State the approach if the rectum is assessed.
Additional findings: relevant free fluid, lymph nodes, strictures, fistulas, inflammatory masses, or suspected abscesses. Describe location and measurements when identified.
Interpretation: a concise impression, confidence and limitations, comparison with the previous examination, and the follow-up or communication plan.
Build the template with editable findings rather than a preselected normal impression. Keep the IUS report available as its own examination record, and incorporate the impression into the clinic note when appropriate. Identify the interpreting service so readers understand who performed and reported the study.
7. Confirm billing before the first clinical session
Ask your billing team to approve the examination order, documentation requirements, visit type, and applicable codes. Determine how clinician and technical components are handled, whether a separately identifiable clinic service is billable, and how patients will be informed about possible charges. Do not assume that point-of-care delivery removes prior authorization requirements.
For US practices, use current payer and institutional guidance to determine the appropriate ultrasound codes. Doppler use within an IUS examination should not automatically trigger a separate duplex charge. CMS notes that abdominal ultrasound and abdominal duplex examinations generally address different clinical scenarios; separate reporting depends on medical necessity and applicable coding requirements. See the 2026 CMS National Correct Coding Initiative Policy Manual.
Canadian practices should establish the relevant provincial and institutional payment arrangements. US CPT examples do not determine Canadian billing. In every setting, test the workflow with the billing team and review actual claims or payment outcomes during the pilot.
8. Launch a manageable pilot and review the results
The committee’s business plan offers an illustrative progression: feasibility and preparation in months 1–3, integration and launch in months 4–9, and expansion in months 10–24. Use those phases to organize work, while allowing training access, credentialing, purchasing, and EHR integration to determine your own schedule.
Start with a defined patient group and agreed scan capacity. Review early examinations with a mentor or experienced colleague, obtain patient and staff feedback, and resolve problems before increasing volume.
Clinical use and quality: indications, examination completeness, limitations, correlation with other available assessments, and whether findings informed management.
Operations: appointment access, time needed for scanning and reporting, successful image transfer, report completion, and communication of results.
Patient experience: understanding of the result, satisfaction, preparation instructions, and clarity about potential costs.
Financial performance: completed examinations, actual collections, denials where applicable, and expenses compared with the local pro forma.
Expand when your team can consistently deliver the full process. Additional sessions, referrals from colleagues, and trainee participation should follow demonstrated capacity and appropriate supervision.
Your launch checklist
A named clinical lead and a defined initial service.
An approved budget, equipment plan, and maintenance contact.
A training, supervision, and credentialing plan for each examiner.
Agreed room access, appointment types, referral instructions, and patient information.
A tested route for orders, labeled images, reports, and interval comparison.
Locally reviewed billing, authorization, and consent processes.
A clinician responsible for interpretation, results communication, and follow-up.
A pilot review plan with measures that matter to your practice.
For training opportunities and further learning, visit iUSCAN Education. To share implementation questions or experience from your center, contact iUSCAN.